The Battle of Midway
The Battle of Midway, fought 4-7 June 1942, is regarded by many to be as significant for the USA and Australia as any of Nelson’s victories were for England. This article, downloaded from the USN’s Naval Historical Center’s web site, describes the fight:
The Battle of Midway, fought near the Central Pacific island of Midway, is considered the decisive battle of the war in the Pacific. Before this battle the Japanese were on the offensive, capturing territory throughout Asia and the Pacific. By their attack, the Japanese had planned to capture Midway to use as an advance base, as well as to entrap and destroy the U.S. Pacific Fleet.
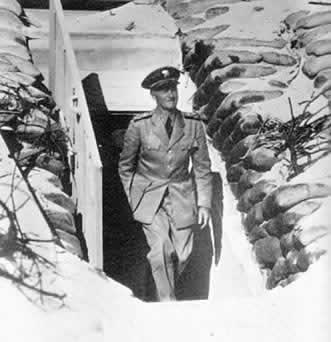

The Commanders: ADML Chester Nimitz inspects a Midway Island bunker after the battle (left) and ADML Isoruku Yamamoto considers his strategy.
Because of communication intelligence successes, the U.S. Pacific Fleet surprised the Japanese forces, sinking four of the six Japanese carriers that had attacked Pearl Harbor only six months before, while only losing one carrier. After Midway, the Americans and their Allies took the offensive in the Pacific.
Following the outbreak of the Pacific War in December 1941, the Japanese armed forces conducted military operations against U.S., British Commonwealth, and Dutch possessions in the Pacific and Southeast Asia. The first phase of these operations, which was the seizure of Malaysia, Singapore, the Dutch East Indies, the Philippines, and various island groups in the central and western Pacific, was virtually complete by March 1942. The second phase, initiated by Japanese Imperial Headquarters on 23 January, was designed to isolate and neutralise Australia and India.
In the Pacific, this plan envisioned the seizure of bases in Papua-New Guinea and the Solomon Islands, which would be used to support future operations against New Caledonia, Fiji, and Samoa. By early March, with the seizure of Lae and Salamaua, the entire north coast of Papua-New Guinea had fallen to Japanese forces who were planning an amphibious invasion of Port Moresby.
COMMINT: Pearl Harbour and Melbourne
By this time, two secure American naval intelligence centres were in operation in the Pacific: one in Melbourne, Australia, and another at Pearl Harbour (Hypo). A third, at Corregidor (Cast), was rapidly disintegrating under Japanese air and artillery attacks on the island. Its cryptanalysts and equipment were in the process of evacuation to Melbourne.
These facilities intercepted Japanese radio communications and, through traffic analysis and code breaking, uncovered the location of major fleet units and shore based air forces. More importantly, by translating messages and studying operational patterns, Melbourne and Hypo predicted future Japanese operations. The intelligence centres provided their analysis, through daily communications intelligence (COMINT) briefings and warning reports, to senior American commanders, including Commander in Chief, U.S. Fleet (ADML Ernest J. King), and Commander-in-Chief, Pacific Fleet (ADML Chester W. Nimitz).
In early March, the Japanese postponed their planned seizure of Port Moresby because of previous events. An American carrier raid on Japanese shipping at Lae and Salamaua on the 10th, along with a previously unsuccessful attempt to attack Rabaul on 20 February, had demonstrated to Commander-in-Chief, Fourth Fleet (ADML Shigeyoshi Inouye), that the Japanese were not assured of air superiority in the region. It was not until early May, when ADML Inouye had three carriers for operations, that the invasion could begin.
On 7-8 May, the first all-carrier battle in history took place in the Coral Sea. Each side had a carrier damaged, while the American lost the carrier USS Lexington and the Japanese lost the light carrier Shoho. More important, the Japanese broke off their invasion attempt. It was the first time the Japanese had been stopped in the Pacific.
Order of battle
Significantly, American cryptanalysts had provided crucial order of battle and operational communications intelligence to the Allied commanders in the South Pacific. In addition to this advance toward Port Moresby, evidence that Japan was intent on expanding east of the Marshall Islands appeared in COMINT in early 1942.
Land-based air units and equipment began appearing in message traffic to and from the Marshall Islands and the Mandates. On 4 March, the designator “AF” began appearing in partially decoded messages. Then, on 5 March, Japanese seaplanes, refuelled from a submarine at French Frigate Shoals, Territory of Hawaii, conducted a small armed reconnaissance mission over Oahu.
Finally, on 13 March, American cryptanalysts both broke the Japanese Navy’s General-Purpose Code (JN 25) and identified “AF” as Midway Island.
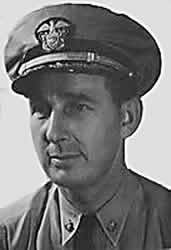
CAPT (then CMDR) Joseph J. Rochefort devised the decisive disinformation intelligence strategy.
On 16 April, after several months of discussion, Commander-in-Chief, Combined Fleet (ADML Isoruku Yamamoto), convinced the Imperial General Staff to agree to his Midway and Aleutians strategy for the summer. In ADML Yamamoto’s view, the capture of Midway Island would allow Japan to pursue its Asian policies behind an impregnable eastern shield of defences in the Central Pacific.
The centrepiece of this plan was a feint toward Alaska, followed by an invasion of Midway. When the U.S. Pacific Fleet responded to the landings on Midway, Japanese carrier and battleship task forces, waiting unseen to the west of the Midway Strike Force, would fall upon and destroy the unsuspecting Americans. If successful, the plan would effectively eliminate the U.S. Pacific Fleet for at least a year and provide a forward outpost from which ample warning of any future threat by the U.S. would come.
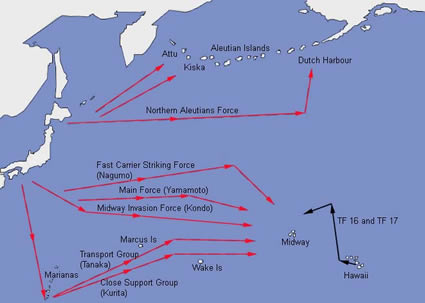
The Japanese thrust and the American response.
Two days later, LCOL James Doolittle and a small number of American airmen from the U.S. Army Air Corps took off from USS Hornet in land-based bombers to attack the Japanese home islands. As a result of this attack, which caused the Japanese to want to extend their first line of defence as far east as possible, the Japanese advanced the date of their planned attack on Midway.
On 5 May, Imperial General Headquarters issued Navy Order No. 18, directing Admiral Yamamoto to carry out the occupation of Midway Island and key points in the western Aleutians in cooperation with the Army.
At the same time, Japanese Navy communication activity in the vicinity of Japan dramatically increased, reflecting naval exercises conducted in preparation for both the Midway and Aleutian operations. On 7 May, Hypo provided a translation of the agenda for a Japanese aviation conference, called by Commander-in-Chief, First Air Fleet (VADM Nagumo), scheduled for 16 May. The conference concerned tactics to be employed in obtaining air superiority over a target, assisting in amphibious landings, and bombing and strafing attacks to wipe out local resistance.
Melbourne intercept and fake fresh water deception
On 9 May, Melbourne intercepted and translated 1st Air Fleet Striking Force Order No. 6, which confirmed the creation of a new carrier strike force and that a major fleet movement would begin on 21 May. In response to this COMINT, American cryptanalysts supplied warning notices of Japanese offensives scheduled for late May.
On 19 May, the Officer in Charge of COMINT processing at Hypo (CMDR Joseph J. Rochefort) and the intelligence officer for the Pacific Fleet (LCDR Edwin T. Layton), identified Midway and Dutch Harbour, Aleutian Islands, as specific Japanese objectives.
On the 22nd, following a fake fresh water distillation failure report, Melbourne completely confirmed that “AF” meant Midway. Hypo then discovered the date cipher used in Japanese message traffic. This meant analysts could determine exactly when the attack would take place.
After examining previously intercepted messages, Hypo predicted an attack on Midway on 4 June. ADML Nimitz used this estimate to plan American countermeasures.
On 26 May, since COMINT suggested the Japanese intended to approach from that direction, the submarine USS Gudgeon (SS-211) sailed for a surface patrol northwest of Midway. Also on the 26th, aircraft ferry USS Kitty Hawk (AKV-1) arrived at Midway with reinforcements for Marine Air Group (MAG) 22, a light tank platoon earmarked for a mobile reserve, and the Third Defense Battalion, equipped with 76mm (3-inch) anti-aircraft guns.
On that same day, Task Force 16 (TF 16) under the command of RADM William F. Halsey, and centred around USS Hornet (CV- 8) and USS Enterprise (CV-6), returned to Pearl Harbour from the South Pacific to begin preparations for the upcoming battle. Although suffering from damage inflicted by Japanese bombs during the 7-8 May Battle of the Coral Sea, USS Yorktown (CV-5) returned the next day.
Fast Carrier Strike Force
Also on the 26th, the Japanese Northern Force, which included two light carriers, sailed from Ominato toward the Aleutians. The next day, Japanese forces began getting under way for Midway. Chief among them was First Mobile Force, Carrier Strike Force (VADM Nagumo Chuichi), comprising the four large carriers Akagi, Kaga, Soryu, and Hiryu with a total of 229 carrier aircraft.
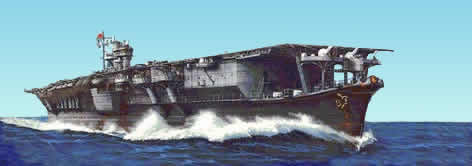
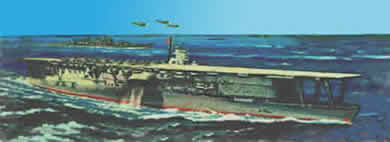
HIJMS Soryu: 19,500 tons, length 227 metres (746 feet), eight boilers, four shafts, 34 knots,1250 crew, 18 Mitsubishi A6M Zero fighters, 18 Aichi D3 Val dive bombers, 18 Nakajima BN5 Kate torpedo bombers and two dedicated scouts.
On the 28th, the Japanese First Fleet, Main Body (ADML Yamamoto in battleship Yamato), sortied from home waters. The Second Fleet, Escort Force (RADM Tanaka Raizo), including 15 transports, sailed from Saipan; Second Fleet, Occupation Support Force (RADM Kurita Takeo) sortied from Guam. These forces were supported by 17 patrol seaplanes.
TF 16 (RADM Raymond A. Spruance), formed around Enterprise and Hornet, departed Pearl Harbour on 28 May to take up a position northeast of Midway. Spruance replaced Halsey for this operation because Halsey was suffering from a painful shingles attack.

USS Enterprise CV-6, at 0730 4 June 1942. 25,500 tons, 274 x 33.3 x 7.92 metres (809 x 109.5 x 26 feet) nine boilers, four Parsons geared turbines, 120,000 SHP, four shafts, 32.5 knots, 2217 crew, 90 aircraft.
Two days later, Task Force Seventeen (TF 17) under the command of RADM Frank Jack Fletcher, formed around the quickly repaired Yorktown, and sailed from Pearl to join TF 16 northeast of Midway. When TF 17 and TF 16 joined about 350 miles northeast of Midway on 2 June, RADM Fletcher became officer in tactical command. The three American carriers, augmented by cruiser-launched float-planes, provided 234 aircraft afloat. These were supported by 110 fighters, bombers, and patrol planes at Midway.
As part of the pre-battle disposition, 25 fleet submarines, under the command of RADM Robert H. English, were deployed in scouting and ambushing positions around Midway.
French Frigate Shoals
Meanwhile, on 29 May, the seaplane tender (destroyer) USS Thornton (AVD-11) arrived at French Frigate Shoals to relieve light the minelayer USS Preble (DM-20) on patrol station there. The presence of U.S. ships at French Frigate Shoals prevented the Japanese from refuelling flying boats to reconnoitre Pearl Harbour.
Although the Japanese could not visually confirm the departure of Task Forces 16 and 17 from Pearl Harbour, American preparations to defend Midway were on the verge of discovery anyway. Japanese COMINT stations not only learned of carrier movements in and out of Pearl Harbour, simply by listening to increased air-ground radio chatter, but traffic analysis of “Urgent” American radio messages coming out of Pearl Harbour suggested at least one Task Force was at sea.
Incredibly, these discoveries by Japanese COMINT were withheld from the Midway Strike Force because of Yamamoto’s strict radio silence restrictions.
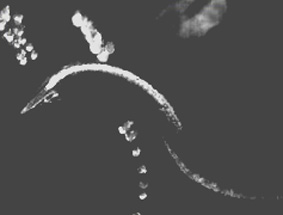
Hiruyu successfully evades B-17 bombs, 3 June 1942.
On 3 June, in the preliminary moves of the Battle of Midway, American land-based aircraft from Midway located and attacked Japanese transports about 600 miles west of Midway Island. U.S. Army Air Force Boeing B-17 Flying Fortress bombers inflicted no damage, however, and four Consolidated PBY Catalinas from VP-24 were sent out for a night attack on the approaching transports.
As part of the overall Japanese plan, the Second Strike Force (RADM Kakuta Kikuji) bombed Dutch Harbour with planes from light carriers Ryujo and Junyo. In an event whose importance became clear only later, one Mitsubishi A6M Zero carrier fighter was disabled by anti-aircraft fire and made an emergency landing on Akutan Island. The pilot, fooled by the flat ground, flipped the plane over upon landing in a bog and was killed. American aeronautical engineers later studied the plane to discover its strengths and weaknesses.
Just after midnight on 4 June, ADML Nimitz, based on patrol plane reports, advised Task Forces 16 and 17 of the course and speed of the Japanese “main body”, also noting their distance of 574 miles from Midway. Shortly after dawn, a patrol plane spotted two Japanese carriers and their escorts, reporting “Many planes heading Midway from 320 degrees distant 150 miles.”
First shot: PBYs
The first attack on 4 June, however, took place when the four night-flying PBYs attacked the Japanese transports northwest of Midway with one PBY torpedoing fleet tanker Akebono Maru. Later that morning, at roughly 0630, Aichi D3A Val carrier bombers and Nakajima B5N Kate torpedo planes, supported by numerous fighters, bombed Midway Island installations.
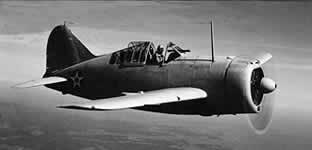
Although defending U.S. Marine Corps Brewster F2A Buffalo and Grumman F4F Wildcat fighters suffered disastrous losses, losing 17 of 26 aloft, the Japanese only inflicted slight damage to the facilities on Midway. Motor Torpedo Boat PT-25 was also damaged by strafing in Midway lagoon.
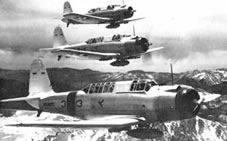
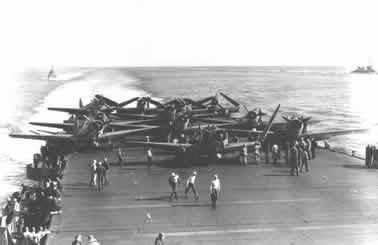
SB2U-3 Vindicator scout bombers (left) and Brewster Buffalo F2A fighters were easy meat for the Japanese Mitsubishi Zero.
Over the next two hours, Japanese Zeros on Combat Air Patrol (CAP) and anti-aircraft fire from the Japanese fleet annihilated repeated attacks by American Marine Corps aircraft, including Douglas SBD Dauntless and Vought SB2U Vindicator scout bombers from VMSB-241, Navy Grumman TBF Avenger torpedo bombers from VT-8 detachment, and U. S. Army Air Force torpedo-carrying Martin B-26 Marauder bombers sent out to attack the Japanese carriers.
Army Air Force Flying Fortresses likewise bombed the Japanese carrier force without success, although without losses to themselves.
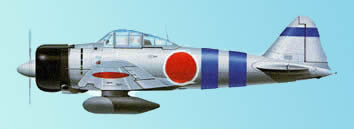
The Japanese Mitsubishi A6M2 Zero (Zeke) was superb fighter with a very low (60 knots) stalling speed. It had a 14 cylinder 940 hp Nakajima NKIC Sakae 12 engine, two 20 mm cannon and two 7.7 mm machine guns. It carried two 30 kg bombs and a 60 kg bomb or drop tank. Even at 2,410 kg (5,313 lbs) fully loaded it had an extraordinary 1975 nm (3105 km) range with drop tanks.
Between 0930 and 1030, Douglas TBD Devastator torpedo bombers from VT-3, VT-6, and VT-8 on the three American carriers attacked the Japanese carriers. Although nearly wiped out by the defending Japanese fighters and anti-aircraft fire, they drew off enemy fighters, leaving the skies open for dive bombers from Enterprise and Yorktown. VB-6 and VS-6 Dauntlesses from Enterprise bombed and fatally damaged carriers Kaga and Akagi, while VB-3 Dauntlesses from Yorktown bombed and wrecked carrier Soryu. American submarine Nautilus (SS-168) then fired torpedoes at the burning Kaga but her torpedoes did not explode.
HIJMS Akagi had a rare port side island. Built on a converted battlecruiser hull: 42,000 tons, 261 x 31 x 8.7 metres (855 x 102 x 28.5 feet) 11 boilers, four steam turbines, four shafts, 133,000 shp, 31 knots, 2000 crew, 18 Zero fighters, 18 Val dive bombers, 18 Kate torpedo bombers.
At 1100, the one Japanese carrier that escaped destruction that morning, Hiryu, launched Val dive bombers that temporarily disabled Yorktown around noon. Three and a half hours later, Hiryu‘s Kate torpedo planes struck a second blow, forcing Yorktown‘s abandonment.
In return, Dauntlesses from Enterprise mortally damaged Hiryu in a strike around 1700 that afternoon. The destruction of the Carrier Strike Force compelled ADML Yamamoto to abandon his Midway invasion plans, and the Japanese Fleet began to retire westward.
VT-6 Squadron Douglas TBD Devastator torpedo bombers range for a launch from Enterprise in the Battle of Midway.
During the battle, Japanese destroyers had picked up three U.S. naval aviators from the water. After interrogation, however, all three Americans were murdered. One TBD pilot, LEUT George Gay, escaped detection by the Japanese ships and was later rescued by a PBY.
On 5 June, TF 16 under command of RADM Spruance pursued the Japanese fleet westward, while work continued to salvage the damaged Yorktown. Both Akagi and Hiryu, damaged the previous day, were scuttled by Japanese destroyers early on the 5th.
Last air attacks
The last air attacks of the battle took place on 6 June when dive bombers from Enterprise and Hornet bombed and sank the heavy cruiser Mikuma, and damaged destroyers Asashio and Arashio, as well as the cruiser Mogami. At ADML Spruance’s expressed orders, issued because of the destruction of three torpedo squadrons on 4 June, Devastators from VT-6 that accompanied the strike did not attack because of the threat to them from surface anti-aircraft fire.
After recovering these planes, TF 16 turned eastward and broke off contact with the enemy. COMINT intercepts over the following two days documented the withdrawal of Japanese forces toward Saipan and the Home Islands.
Meanwhile, on the 6th, Japanese submarine I-168 interrupted the U.S. salvage operations, torpedoing Yorktown and torpedoing and sinking the destroyer USS Hammann (DD-412). Screening destroyers depth-charged I-168 but the Japanese submarine escaped destruction. Yorktown, suffering from numerous torpedo hits, finally rolled over and sank at dawn on 7 June.
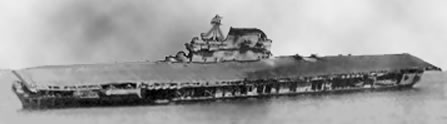
USS Yorktown (above) listing and abandoned after taking three bomb hits, two aerial torpedoes and damage from four torpedoes fired by I-168 (below). The submarine’s torpedoes actually sank the destroyer USS Hamman, which was alongside Yorktown providing power for salvage parties. Hamman‘s depth charges exploded as she sank, contributing to Yorktown‘s ultimate fate.
On 9 June, the submarine Trout (SS-202) rescued two survivors from the sunken Japanese heavy cruiser Mikuma. Ten days later, on the 19th, the seaplane tender (destroyer) USS Ballard (AVD-10) was directed by a PBY to the site where Hiryu crewmen were in the water. The tender rescued 35 Japanese survivors who, as members of the engineering department deep in the ship, had been left for dead in the abandonment of the carrier. On 21 June, a PBY from VP-24 rescued two men from an Enterprise TBD about 360 miles north of Midway. These were the last survivors of the Battle of Midway to be recovered.
Thanks to American signals intelligence, judicious aircraft carrier tactics, and more than a little luck, the U.S. Navy had inflicted a smashing defeat on the Japanese Navy. Although the performance of the three American carrier air groups would later be considered uneven, their pilots and crew had won the day through courage, determination, and heroic sacrifice.
The Japanese lost four large carriers that had attacked Pearl Harbour, while the Americans only lost one carrier. More importantly, the Japanese lost over one hundred trained pilots, who could not be replaced.
Recognizing this defeat for what it was, ADML Nagumo’s Chief of Staff later wrote: “Felt bitter…I felt like swearing”. In a larger strategic sense, the Japanese offensive in the Pacific was derailed and their plans to advance on New Caledonia, Fiji, and Samoa postponed. The balance of sea power in the Pacific shifted from Japan to an equity between America and Japan. Soon after the Battle of Midway the U.S. and their allies would take the offensive in the Pacific.
References:
Cressman, Robert J. No End Save Victory: A Chronological History of the U.S. Navy in World War II, 1939-1945. Washington DC: Naval Historical Center, 1998. [unpublished manuscript]
Parker, Frederick D. A Priceless Advantage: U.S. Navy Communications Intelligence and the Battles of Coral Sea, Midway, and the Aleutians. Fort Meade MD: Center for Cryptologic History, National Security Agency, 1993.